How to connect Raspberry Pi 5 to LabVIEW and run your first project
LabVIEW (Laboratory Virtual Instrument Engineering Workbench) is a powerful graphical programming environment developed to simplify the creation of engineering and scientific applications.
Unlike traditional text-based languages, LabVIEW employs dataflow programming, where the movement of data between nodes determines execution order. Programs in LabVIEW are called Virtual Instruments (VIs), which mimic the behavior of physical instruments by combining a user interface, data processing, and visualization.
The front panel in LabVIEW serves as the user interface, offering interactive controls and indicators, while the block diagram represents the program logic through graphical code, often resembling a flowchart. Together, these components enable engineers and scientists to design, simulate, and execute complex measurement, analysis, and control tasks with minimal effort. With its extensive analysis functions, hardware drivers, and protocol support, LabVIEW is widely used for data acquisition, automated testing, instrument control, and system design. Advanced features, such as FPGA integration and support for real-time systems, make it a versatile platform for applications ranging from electronic design validation to industrial automation.
Here is the summary of steps connecting Raspberry Pi-5 with LabView and executing a simple “Hello World” project
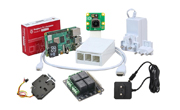
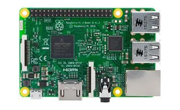
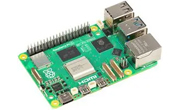
Part 1: Prepare the Raspberry Pi 5 board with OS (Debian Bookworm) on SD card
Insert your SD card, open Raspberry Pi Imager, select the 32-bit OS from the list, as the LabView community edition supports only 32-bit.
 When flashing the SD card, enable SSH directly in the Raspberry Pi Imager tool by clicking the OS customization button as shown below. Proceed further to flash the OS.
Know the IP address of your RPi5
Once the OS is flashed on SD card, place the SD card on Raspberry Pi 5 board. Make a setup by inserting HDMI cable, mouse, and keyboard, power up the board and know your board’s IP address as shown.
(In my case IP Address is 192.168.6.87)

Install community edition of LabView on your computer
LabVIEW Community edition is a free tool that may only be used for personal, non-commercial, and non-industrial purposes. You need to register before downloading from the link: Click here
Proceed to install LabView

Connecting RPi5 to LabView
Once the SW is installed, we need to connect RPi 5 to LabView, To use the Raspberry Pi device with LabVIEW, you need the LabVIEW Hobbyist/LINX Toolkit. This toolkit is automatically installed with LabVIEW Community Edition and allows LabVIEW to communicate with the Raspberry Pi and control its hardware.
Ensure that your Raspberry Pi and your working computer/laptop are connected to the same network.
Open the LabView editor and navigate to Tools > Hobbyist > Target Configuration.

Enter the IP address, username and password of your Raspberry Pi.

The Default Username will be 'pi', and the password will be 'raspberry'. Then click the ‘Connect’ button.
Note: In my case, the IP address is "192.168.6.87," and the username has been changed to ‘xyz’.
Once connected, you will see the Raspberry Pi logo on the left and a log file with details about the connection status.

LabView will be installed on the target board, and you can see the installed version.

You can confirm the target board hardware and OS version information as shown:

Part-2: Now it’s time to execute a sample project on Raspberry Pi 5 using LabView
Navigate to Help > Find Examples.

Double-click “LINX-Blink (simple).vi" to open the following Window. Then, close the Example Finder.The functions in the diagram are part of the LINX toolkit, which provides a common API for the supported devices. The pattern usually includes an open call, followed by some actions, and a close call.

We will execute a simple project in which an "LED" is connected to a digital output channel – 13, controlled through a LabView LED control on/off switch. The basic schematic for the LED circuit and its status is shown.
Save a copy first. Go to File>Save As... to open the File dialog box.
Select Substitute Copy for Original and then Click Continue.

Save the Project to your local drive, giving it a custom name (in my case, I have saved it as "Simple on-off control.vi")
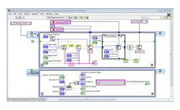
To view the block diagram
Click on Window> “Show Block Diagram” and ensure that the “Local I/O” is selected.

To deploy the VI to your device, you will need a project.
Go to Project> Create Project…
Select Blank Project and click Finish. When prompted to add the VI to the Project, select Add.

Now, add the Raspberry Pi to the Project.
Right-click the Project entry and select New>Targets and Devices.
You can manually add the device by selecting New target or device > LINX devices > Raspberry Pi and clicking OK.

Right-click the Raspberry Pi and select Properties. Enter the IP address you noted during the configuration process, then click OK.

Now, move the VI to the target.
Close the VI, go back to the Project Window and drag the VI from “My Computer” to” Raspberry Pi."
To verify that your VI is associated with the correct target, double-click the VI to reopen it.

Save your Project (I have named the Project “Simple on-off control.lvproj”)

Based on the schematic shown on the front panel, set up an LED and resistor. Connect it to the ground and DIO 13.

Verify connectivity by right clicking the device and selecting Connect. After a moment, it should connect, and the small green dot should change from dark to light.

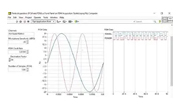
Click the Run button.

LabVIEW deploys the necessary code to the Raspberry Pi. Once this process completes, the VI will begin running.
When you press the button, the Labview front view panel window toggles both the physical LED and the status LED control. You can also view the project execution video.